
We are so close to the end of our school year. Eight more days to go.
Research papers are soon due. My house looks like a library threw up--books everywhere!
Research papers are soon due. My house looks like a library threw up--books everywhere!
I am itching to get to the many many projects I have lying around our house and our garage.
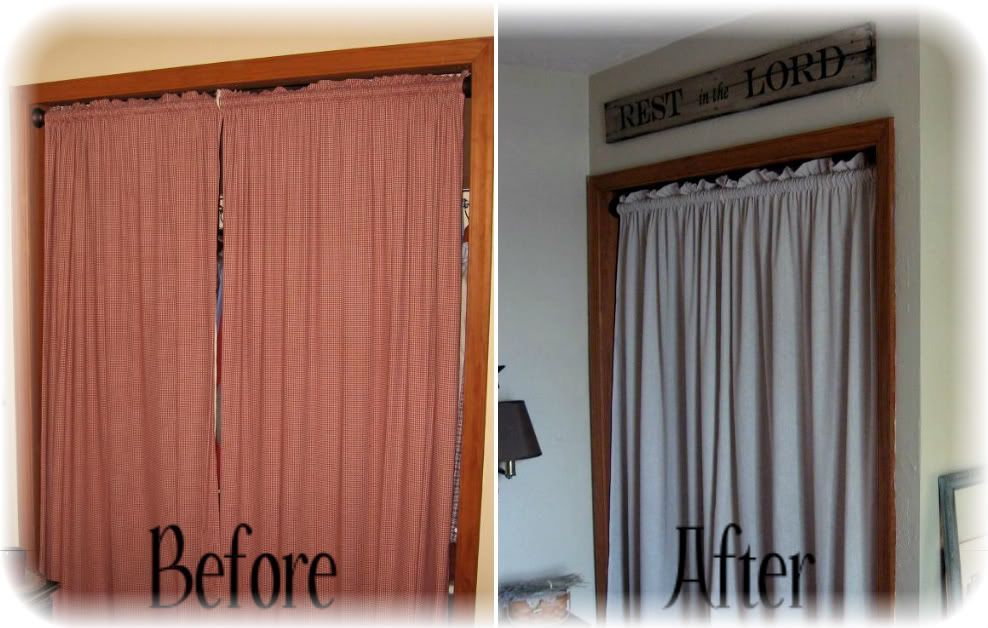
One small project was to make a sign for our bedroom.
 I wanted a verse that would encourage me.
One small project was to make a sign for our bedroom.

I came across this one:
"Rest in the Lord and wait patiently for him:...." Ps.37:7
"Rest in the Lord and wait patiently for him:...." Ps.37:7
I knew that this would be too long for the board I chose, but the first four words were perfect for me.
I have a huge problem with worry, so I thought this would be a good verse to see when I go to bed after making so many decisions during the day. It would also be good to remind myself every morning when I start my day.
I used one of the boards from a pallet.
I painted it with my sample paint I had for my walls in our bedroom--a stone color.

The words were too big, but that was a good mistake.
I thought I could make the words "in the" smaller and with a different font.
 To transfer the lettering I colored on the back of the letters with a charcoal pencil.
I thought I could make the words "in the" smaller and with a different font.

I positioned it on the board where I wanted it and then tacked it with some painter's blue tape.

See, I told you I was a visual person.

It transfers the charcoal onto the board.


It is perfect!

I hammered in the nails, hung up the sign, and it look crooked.
Apparently the guy who built the closet didn't level off things.
I had to mess with the nails so the sign didn't crooked with the ceiling nor the closet.

Apparently the guy who built the closet didn't level off things.
I had to mess with the nails so the sign didn't crooked with the ceiling nor the closet.

I also sewed some new Linen curtains.
I am loving the change in our bedroom.
I am loving the change in our bedroom.

Linked Up With:
I absolutely love your sign!! thank you for showing us how you did it!!
ReplyDeleteWhat a cute little project Tammy. Love that you used the Sharpie, it sure gave it a very defined edge. I also like the closet with the off white curtain better:)
ReplyDeleteTammy, this is such a great tutorial I always wanted to know how to do this :) your sign looks great, I will have to add this to my "to do" list. My next project is bolster pillows...I plan on attending the Pillow Palooza linky party next week so I need to get started. Have a great weekend!
ReplyDeleteIt looks great, Tammy!! Your bedroom is really coming together now the way you want it to look. :)
ReplyDeleteLove the sign. I always need to be reminded to "Rest in the Lord and wait paitiently".
ReplyDeleteThank you for posting this. It’s exactly what I was looking for!
ReplyDeleteI love your sign, I needed to see
ReplyDeletethis verse tonight. You know one of those weeks a bit discouraged, but your sign is beautiful.
Praise God,
Martha
Thanks so much for showing how the letters were transferred. I've been wanting to do something like this for the longest...I love your sign!
ReplyDeleteBeautiful and I love seeing how you did it and that it can be done! Rest in the Lord, a good reminder for me right now. Thank you! I found you at Knick of Time Interiors Party. Come by and visit my place sometime. I'd love to hear from you too!
ReplyDeleteLiz
Very cute sign...thanks for sharing the tutorial! I found you through the Knick of Time link party!
ReplyDeleteLove it! Just home from Bible study and this is the perfect fit for what we were studying!
ReplyDeleteThe colors are so natural...I, also, found you through the Knick of Time link party!!!
ReplyDeleteBlessings, Becky
Love it! What a nice addition to your bedroom. Very easy transfer. Thank you for the step by step instructions!
ReplyDeleteHave a blessed day!
Nic
I love the sign. I recently made signs to and I used stensils, but love the fact that you gave us instructions with charcols! Follwoing you now, Di@cottage-wishes
ReplyDeleteI pinned this from Pinterest......just had to say thank you for the great tutorial!!!!! Love it. Will do it!
ReplyDeleteBlessings, Linda
This is so cute.. I love the saying and I LOVE OLD STUFF! perfect :) *Newest Follower Here*
ReplyDeleteI love this idea and tutorial, thank you! I have a pallet I am going to use to make a sign like this for my bathroom:) xo
ReplyDeleteI love this idea and tutorial, thank you! I have a pallet I am going to use to make a sign like this for my bathroom:) xo
ReplyDeleteSo cool! I didn't know Sharpie had paint pens! Learn something new everyday!
ReplyDeleteGreat tut! So easy to follow your directions, thank you!
ReplyDeleteThis is really cool! I definitely need to try this! We have some old fence wood in our garage, just waiting for a project such as this, so I now know what I'm going to do with it. Thank you!
ReplyDeleteGreat Tutorial. I found you on Pinterest. Would love for you to share at the Creative Corner Hop. Your newest GFC follower.
ReplyDeleteHolly
Holly's Stamping Addiction
I FOUND YOU ON pINTEREST!!! YOU ARE VERY TALENTED AND THIS WILL COME IN HANDY tHANK YOU FOR SHARING!!!
ReplyDeleteWonderful work! Where did you find the Sharpie Paint Pen? I didn't know they made those!
ReplyDeleteThanks SO much for the very detailed tutorial!! I have been wanting to make a sign of my own but wasn't sure how to do the lettering without buying expensive vinyl letters. Does the same charcoal-trace-rub off technique work on canvas?
ReplyDeleteSaw this sign on pinterest. What a great job. I never would have thought to use a Sharpie.
ReplyDeleteI saw this on Time Warp Wife's Friday Five. This is a fantastic idea and I cannot wait to make my own sign!! Thanks for posting!
ReplyDeleteI would love it if you stopped by my blog as well. I'm going to link to this page from my FB page. Too great of an idea NOT to share!
Blessings.
What a great idea and even looks pretty easy to do!!! I didn't know Sharpie had a Paint marker. I see this happening in my future - thanks for the great tutorial.
ReplyDeleteOh, just lovely! I came over from Time Warp Wife's Friday Five, as well. I've been wanting to make some signs, and you just showed me how. I've pinned it, too!
ReplyDeleteYes i agree with everyone. This is so nice. What a good reminder as well.
ReplyDeleteBlessings Gail
I have been waiting to find a way to put up scripture above the bedrooms doors and this would be perfect and I can get my teens involved by having them do there own. Thank you so much this is a answered prauer.
ReplyDeleteBe Blessed,
Yohana Munson
I hope to try this!
ReplyDeleteOh my ... I love this idea. I think I can do this for Christmas presents for my grown children. Were these Sharpie Paint Markers? And when you did the sanding, did you sand over the words, and did you stain over the whole thing or just the edges? thanks
ReplyDeleteNice!! I also make signs, people can get the text they want and then I paint it for them. I relly love this! I also do Canvas. Lyrics is popular at the moment. I am happy as long as people want to buy my homemade stuff =).
ReplyDeleteHttp://fotolia.blogg.se
Stunning, love it! In case anyone is wondering, the large font is "Engravers MT" and the small font is "Monotype Cors"! Thanks again! :o)
ReplyDeleteDo you think this would work on a canvas as well? I am looking at make some christmas gifts and love this idea and one other I plan on was using a canvas. Thank you for posting!!
ReplyDeleteTammy this is AWESOME!!! I am so copying this for my new house with my favortie verse. To Pray is to let GO and LET God take over(LET GO AND LET GOD). Thanks for the great idea.
ReplyDeleteWanda from OKC
What a great project with a great tutorial. Sounds like a nice gift for my daughter. Thanks
ReplyDeleteSaw this on Pinterest and always wanted to know how to transfer type to other objects. Thanks for sharing!
ReplyDeleteAnnie from DFW
I love your sign! It's beautifully rustic! Thank you so very much for taking the time to show us how you did this! It's so very helpful..so excited to do it!
ReplyDeleteI saw you on Pinterest. I'm a worrier too, so it's a great message to take to heart. Thanks.
ReplyDeleteThank you for the very clear instructions. I am wondering if you used the oil paint Sharpie or the water based. I have no idea if one would work better than the other. I found your great project on Pinterest.
ReplyDeleteLove it very wel done =)
ReplyDeletexoxoxo Xanne
I love this idea! There's a cute sign on pinterest I want to make for my nephew and I was having a hard time trying to decide how to do the letters. This is perfect! Thank you.
ReplyDeleteI found your blog on Pinterest. I am not the craftiest person, but I think I can do this one! I would love to make signs for my kid's rooms and for gifts. I am sure it is a silly question...but where do you get ahold of a pallet? I see all of these amazing projects with pallet wood and wood wine cartons and I have no idea how to find them! My daughter learned your letter transfer method from her 4th grade teached who named it the "Pencil Poop" method..LOL!
ReplyDeleteWell that's just brilliant! And I love the verse. I wonder if there is a way to transfer the letters on to something painted with a darker color than that stone color? I want to make a sign but it needs to be brown with cream/beige lettering. Short of cutting the letters out of vinyl which I am loath to do, do you think this transfer method would work if you used a light pencil?
ReplyDeleteLove this!! Have you found a foolproof way to take a pallet apart??? :)
ReplyDeleteI loooove it! I was actually wondering how to paint letters on a piece of pallets (we've got tons of them in the barn)...
ReplyDeleteThanks!
Love your charcoal idea! I went out and bought charcoal pieces @ Joanns a few weeks ago...you can print out letters in "outline" fonts on an inkjet printer instead of using all that ink for full colored lettering. For darker wood just place light colored transfer paper under your printed out lettering. They come in multicolored packs-white, yellow, blue, black and red (got mine @ Michaels). I love the quote that you chose...Just beautiful! I hope to make some signs soon!
ReplyDeleteTake care,
Patti
Hi, Viewing this on election night(something else besides that!)and your sign helped us all here. Thank you, beautiful job and also edifying!
ReplyDeleteDonna Hays/Decorative Arts Painter/Nevada
I am not too crafty, but read through your tutorial and I'm thinking I might be able to do this. We are moving into our first (and last) home soon and I wanted to make a list of rules for the house (no politics, sweet, kind thoughts only...something like that). I love your Bible verse and may just look for something in the Bible that will make people think before they enter...I do not need worry or stress in my home either. I thought I would share with you a saying that I made up after my pets passed, my mother passed and I got an autoimmune disease. There was so much to worry about and it only made me more stressed. One day it came to me... and it was like a weight lifted off my shoulders :) Wonder is a much more positive word than worry...
ReplyDeleteBe well... Nancy xo
"I no longer worry about things.
I now exchange the word "worry" with "wonder".
~ Nancy Langston
Very pleased to have found this site,well done! Will try it 'someday' Enjoyed your encouraging thoughts and ideas!
ReplyDeleteWOW! I am so impressed with this simple idea. I was making a sign for my twins' teacher's Christmas gift and this will be perfect! I looked through comments to see if you mentioned where you got the Sharpie paint pen, but didn't see it mentioned anywhere. Could you email me to let me know? My email is sheryl.spears1011@gmail.com. Also did you spray it with clear spray or Mod Podge it to preserve it? Let me know I would dearly love to know. What an awesome post. I will share and I will follow you! Thanks again, Sheryl
ReplyDeleteThanks! I am dying to know what font this is, though!
ReplyDeleteI have my board painted and my letting ready to be transferred. I just realized that you used a Sharpie "Paint" pen. I am sitting here with a bunch of regular Sharpie markers and I am wondering if it's going to work as well. I guess I'll find out soon! Thanks for sharing your project!
ReplyDeleteThis is so brilliant! I have been pondering how to make signs for our home, but couldn't get past the lousy results I knew I'd get with painting. However...coloring in between the lines? That I can do!
ReplyDeleteI love the "rest in the Lord" sign you made! Can I steal it? :) I'm also going to make a series of signs with the "Christmas" names of Jesus...Wonderful Counselor, Prince of Peace, etc.
(I know I'm running on here...and also gushing rather embarrassingly, but seriously... I am so excited to have found your post today! Thank you for sharing this tutorial!)
Hurrah! So So excited to find your tutorial...I can make my own signs now! (I've been wanting to, but hand-painting letters is not my in my skill set. Ahem!) :)
ReplyDeleteLove the "Rest in the Lord" sign you made. I think I'm going to start with a series of Christmas signs of the names of Jesus in Isaiah...Wonderful Counselor, etc.
Thank you!
thanks for sharing! I can' t wait to make a sign now!
ReplyDeletethanks for sharing! I can' t wait to make a sign now!
ReplyDeleteI love this. Everything about it. Pinned!
ReplyDeleteI really like the sign you made, "REST in the LORD". Just a few words. Yet it says a lot. Very calming. I downloaded the fonts and I think the font you used for "REST" & "LORD", was Baskerville Old Face. Thank you for sharing your talent!
ReplyDeleteThank you for sharing how to make a sign. . Love that verse too !! Saw this on Pinterest!
ReplyDeleteNice, why not use carbon paper?
ReplyDeleteThank you! I love this and can't wait to give it a try. I think it would make a great gift.
ReplyDeletethis looks GREAT and much less expensive than the ones you see in stores! Thanks so much for sharing ~ And the verse is fantastic, too!!
ReplyDeleteSharpie "paint pen" ... I've never heard of them before this!!! How totally awesome! ..... you have made my sign-crafting ideas, sooo much easier .... THANK you from this Nova Scotia, Canadian...:)
ReplyDeleteThank you for sharing your tips. A great way to to display your favorite verse.
ReplyDeleteAwesome and crafty tip...thanx for sharing. My castle doors are always open over at my "royal blog"...a little of this and a little of that to browse. Tiffany
ReplyDeleteHow did you apply the wood stain if you had painted it first? I tried doing that but the wood stain did not dry, it was a mess! Any advice would be great, thank you! :-)
ReplyDeleteThank you for the sign tutorial! I just pinned it :-)
ReplyDeleteHi there! I love your sign, and I have pinned and linked your tutorial in my blog! Thank you for a great Idea - I want to do this in the next week! :)
ReplyDeleteWow, thank you for the tutorial, love it, and am getting several ideas from your blog. May I borrow your verse?
ReplyDeletethanks for sharing! so wonderfully simple and hands on!
ReplyDeleteyes ive had that issue when hanging with levels.. eventually realised its simpler to just eyeball it.
a lot of times.. its not the carpenter's fault either.. sometimes wood warps or sags over time throwing all the original alignments out of whack :)
I found you on Pinterest! I love the idea of the signs and you made very clear instructions! I am refurbishing a house and I am definitely making this one of my projects to put in the house! Thank you for posting!
ReplyDeleteThank you for your gift of spirit. I needed something to "show" my niece what I meant when I told her not all prayers are answered immediately. That sometimes the Creator says "no" or "not now." Your sign quote is amazing! What a beautiful woman you are. Rose
ReplyDeleteI just made a project using these techniques. Kinda old school; you don't see them used that much anymore. It was fun to find you (through Pinterest), and I look forward to more fun projects like this one :)
ReplyDeleteGreat post, I really like that homemade sign. The finished piece looked really well done, way to go.
ReplyDeleteSo happy to find you via Pinterest...have added you to my "fav blogs"....and will be a new follower! Blessings-aimee
ReplyDeleteWonderful sign! Found you on Pinterest!! Great job!!~~Angela
ReplyDeleteI found you on Pinterest and I just wanted to say thank you for this tutorial. I used it to make a small sign and it couldn't have been easier! Thanks, again!!
ReplyDelete-Mari
That was fantastic and very helpful! Thank you so much!!!
ReplyDeleteThat was fantastic and it will be so helpful! Thank you so much! !!
ReplyDeleteI love your Sharpie sign. I want to try one.
ReplyDeleteHi this is a great tutorial! I wanted to show you the sign that I made based on your DIY: http://turtandelephant.blogspot.com/2014/01/diy-pallet-sign.html
ReplyDeleteVery good ! I'm going to diy this thanks for sharing
ReplyDeleteWhat a great mini-redo. And I didn't know you could get Sharpies with PAINT in them, I'm in love!
ReplyDeleteI'd love for you to share this at my link party. My very first one is this Friday, Jan 31st, at FlyingC-DIY.com. Hope to see you there!
I love your sign and the verse. I can't wait to try this as I have lots of pallet boards. Thanks for sharing :).
ReplyDeleteGreat idea thanks for sharing from Boston
ReplyDeleteLooks awesome. I have been trying to do the same type of project. However, after I sand and go over the white paint with the dark walnut stain eveything turn purple. When I wipe the stain off (as much as I can) everything is still a lighter shade of purple. Did you find this as well? I just want to know if what I am doing is right or if I'm missing something. What type of white paint finish did you use? Matte?, Semi gloss, egg shell, or high gloss? Thank you for all your help
ReplyDeleteI just found your site as I'm looking for ideas for my daughter's wedding who will be married next Oct.down in GA...venue is a barn .."shabby/chic". I'd like to help her up here in Indiana by getting started on some signage. ;) I also read your "about me" and how interesting that I am also a Tammy and love the Lord, as well! Many Blessings! PS I'm up way too late pinning wedding ideas!!
ReplyDeleteI can't believe this is how you did this! The pencil on the back is how we use to forge our parent's signature on things in high school! Forgot all about it. Now I can use it creatively. Thanks for the flashback and the other tips for making a great looking sign. Love it
ReplyDeleteGreat idea and beautiful , inspirational sign !! Love it !!
ReplyDeleteLove it!
ReplyDeleteWhen I sanded mine the sharpie paint left a shadowing on my board. How did you get yours not to do that?
ReplyDeleteI love the results, and give thanks for the verse! Thanks for explaining the process!
ReplyDelete