"EXCEPT THE LORD BUILD THE HOUSE, THEY LABOR IN VAIN THAT BUILD IT"......Ps.127:1a
Showing posts with label furniture. Show all posts

Tuesday, December 4, 2018

Three Corner Cabinets DIY

Not wanting to pay the price of an old corner wall cabinet for my living room, I settled on the idea of making my own.  I found these cabinets on Craigslist .  I was only going to get one, but the guy was wanting to just get rid of them so he threw in an extra corner and that odd shaped filler piece.
You can see from the collage how these cabinets were supposed to be pieced together.  I thought that the center filler piece would make a neat primitive cabinet.
They all had these footers on them that I had to take off and fill in the holes with wood filler.
I also removed the trim and added some framing piece that was missing.
After sanding them, I made some doors for all three out of planks of wood--some new wood and some from an old toy box.  I carved the locks and door knob with hubby's wood carving tools. (oldest son did start me out on the locks because he was worried I'd slice myself again)  I bought some neat hinges and just painted them.  I used chalk paint as a primer on the hinges first and then painted them with Benjamin Moore's Woodstock along with the cabinets.  I then stained all 3 with Min-wax's Espresso.
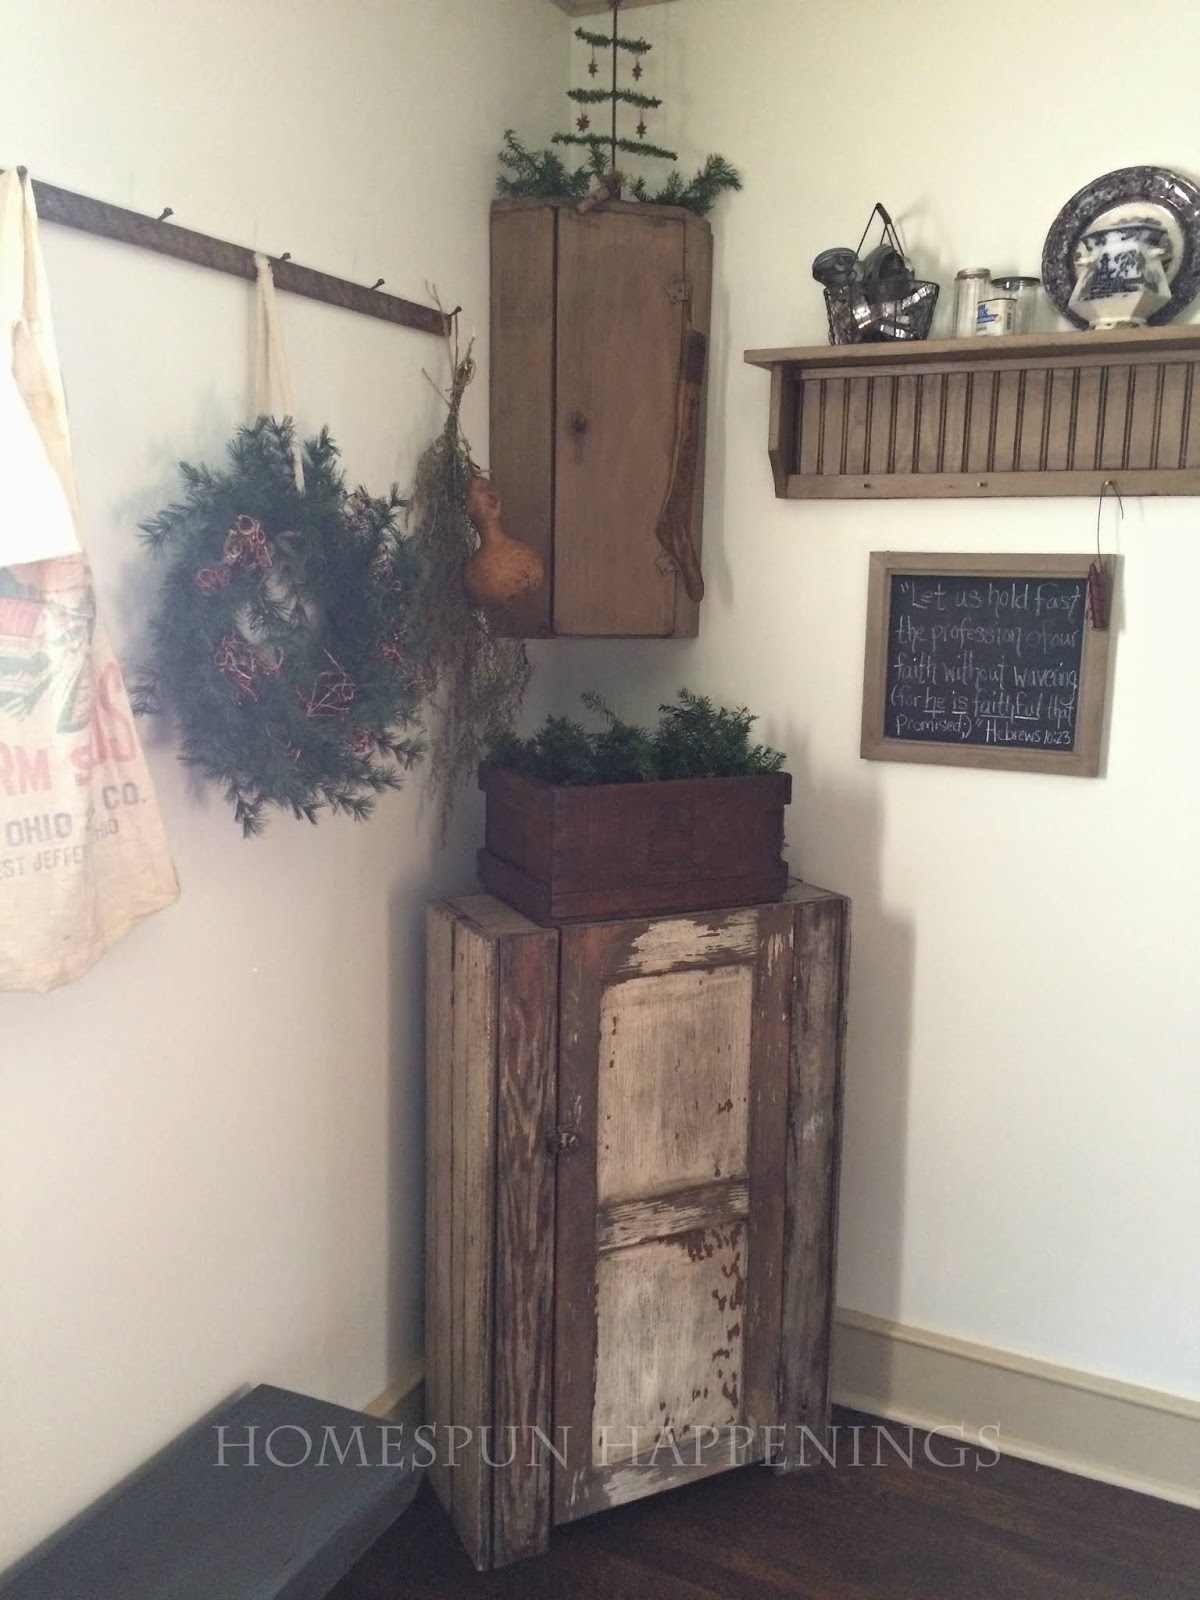
I love the way they turned out.  My favorite one is the 'filler' piece that I turned into a cabinet. I also love the character the stain brings out in the door made of the old toy box planks.
I kept the small one for myself and hung it in my dining room.
It just fits  :)

Wednesday, October 18, 2017

Building a Corner Wall Cabinet: Before and After

My love for distressed colonial (as my son refers to it)
 had me searching for a hanging corner cabinet from the day our offer on this house was accepted.
As I searched, I soon found the prices of these things was either going to make me creative or just keep dreaming!
I chose to be creative!
It was easier to see it once I found this corner cabinet on the FB Market Place.
I just needed to find a door....right?
The size of the opening made it impossible to just find the right cabinet door.
I decided to make one.  
Taking an old toy box I had and recycling the wood made it look like a possibility.
I glued two pieces together and secured them with some wood lath.
 I had to use my plane to help it to fit.
I have limited tools to cut wood ( skill saw and miter saw), there was a lot of uneven lines.
Still is :)
Here it is before and after sanding.
I really liked it in its raw state, but knew it was not going to go well in my living room.
Using hubby's hand carving tools, I had to hand carve the little "lock" for the door .
Gunsmith gray is the color in our living room.  
This is what I painted the cabinet, but I also stained it with 'Early American' Stain.  
The color turned out perfect!


Down the road it will be nice to have some crown molding.  
It is fun just taking our time and finding just what we want at an affordable price.
I think I paid $25 for the shelf. 
I had the paint and the wood for the door.


Monday, October 9, 2017

Roadside Find (with a mystery) Makeover: Dovetail Blanket Chest

  I have been looking at these blanket chests in antique stores, not really caring to buy one.  I really didn't need another chest, but I loved the dovetails, key hole, and candle box inside.  
Free with a little bit of work was just the right price for me.  
What a neat roadside find!
There is an interesting mystery to me behind this little blanket chest find.

The first owners of our home were the Heiseys.
I found this chest at the other end of our small town.  When I opened the lid, there were two names written in child-like cursive writing, Dorothy and Beatrice Heisey.  I was curious to find out whether these two girls were related to the first owners of our home.  I believe they were from a Mennonite background, so I was actually able to match who I believe is the first owner of our home with two sisters named Dorothy and Beatrice.  Am I positive? no...but it is neat to think that the guy's sisters' hope chest is in a home that he once owned.
Here it is the day I picked it up.  Stained and broken, hubby was not very enthused.
I am not sure how old it is.
It was painted with a wood graining technique.
The wood that chipped off of the chest's lid where the hinges are was still in the trunk. 
 I had high hopes that I could fix this and actually use it.
I glued the wood pieces back on the lid and
 sanded it down to the natural poplar wood. 
It was beautiful just sanded.
I left the writing on the inside lid, but I don't think you can see it in the picture.

I used Annie Sloans' Dark wax to finish it.
It turned turned out beautiful, and the lid seems pretty solid.


Tuesday, September 5, 2017

Craft Room Change

 After a year in our new home, I decided that I do not like doing projects in the basement.  Even though it is a big open space, I still find myself upstairs with the family and the sunlight.
At first I wanted this room to be like a breakfast nook/office.  I still want to use it as an office, but I am bringing all of my craft supplies upstairs.
This is were the sun shines so brightly, and the plants drink in the rays!
It is also the perfect place for photos.
Yes, I want to work here not downstairs.
I brought my other hutch out here and am in the process of figuring out what goes where and how to store things.  This room is right off of our family room where everyone gravitates; it too is a bright, welcoming room.
We still use this room like an office too. 
I wanted to take a moment and share about this little table.  When Miss Mustard Seed advertised that she was having a moving sale, I wanted to go see what she was going to get rid of.  She has some amazing things.  One of the pieces she was selling was this drop leaf table.  I believe it was her husband's childhood table.  Anyway, I was scared to ask the price. I finally broke down and asked.  She said $10!  I couldn't believe it.  When I learned it was a family piece, I asked "are you sure?".  She said it is just 'stuff''.  She was very generous and polite; a sweet lady.  Glad I got to meet with her before she moved across the country.
I'm not sure what I am going to do with it, that is if I do anything with it.  My daughter likes it just the way it is--all chipped and used looking. The light oak just really isn't what I like, but it does go well in this room.
I'm really enjoying the change and opportunity to be with the family and great lighting.

Friday, August 4, 2017

My Stepback Reveal

If you've been following me on Instagram and Facebook, you probably know of my recent purchase.
My mud room gets wonderful lighting, which stirred up the desire to use that room for working on projects. When we bought our house last year, I thought I would paint and work on projects in our big basement, however I kept finding myself working on things upstairs where there is more sunlight and people. Now I want to use my mud room for this purpose.  
I  love old cupboards, hutches and stepbacks. I like the idea of using them for storage. I was really excited when I found a reproduction of an old stepback for a great price
They are called stepbacks for the simple reason that the top is set back farther than the bottom piece. I loved the black crackled paint over the red, the old looking wood door latch, and the deep bottom cabinet. What I wasn't so crazy about was the berry red back.
I was less enthused when I set my little collection of yellowware on it.
Regretting the purchase of this cabinet, I told myself to just let it set and get inspired by Pinterest.  So I did. I thought of repainting the whole thing, in the yellow color that I used in my mud room, because there were some scuff marks all around the piece.
BUT I  truly loved the black chippyness.
Searching Pinterest was helpful, but what really helped me was just looking at my hutch I painted last year. The one thing I loved was the wood background.
That would be my first step, to sand off that berry red background. If I couldn't fix the scuff marks then I would repaint the entire piece. As I sanded, I knew I made the right decision.
I started feeling extremely thankful for the person who painted it red, because it left a great layered look to the piece that wouldn't have been there had they not painted it. 
 It looked beautiful just natural.
Next, I was thinking about staining it, but I really liked the way the School Master's Desk turned out that I decided to use dark wax instead.
With my wax brush and cheap dollar brush (to get into the corners), I applied the wax. I soon realized I  loved using the cheap brush over the wax brush. The wax went on so easily. 
Here is a pic so you can see the wood with and without the wax.
Testing the dark wax on the scuff marks, I learned that it hid them well and decided to cover the WHOLE piece with dark wax.
She buffed up nicely

I am super excited at how it turned out, and I love all the room to store our school things!
The other hutch looks great in the mud room and I look forward to organizing my craft supplies in that!

Monday, June 26, 2017

School Master's Desk

I think I may have mentioned my addiction  fondness of the Facebook Marketplace in my previous post.  I like it better than Craigslist for the simple fact that you can actually see the person you are meeting.
I found this lovely schoolmasters desk that needed a little TLC.  It truly was a joy meeting the owners. I was told it was from the 1800s and owned by his great grandfather who was a school teacher.  Whether or not he used it for that purpose, I do not know. 

It had some staining all around and rough wood at places.
I sanded it down inside and out.
I wanted it to look natural, so I used Annie Sloans Dark wax on it hoping that it would darken the filler that was all over it.  It did!
The last thing to do was buff it.
So beautiful!!


Wednesday, January 25, 2017

My Painted Piano

 We got a free piano via Facebook Market Place.  It sounds beautiful, but I was not liking the 1970's basket weave it had and the gold jewelry.  I decided to paint it using Annie Sloan's Charcoal.  I know I am not the first to this, so it was great getting on Pinterest and seeing all the great colors people chose.  I didn't want my piano to be a focal point in my home...so black it is.
 Here is a better pic of the basket weave.
I needed to replace it with some thin pieces of wood. 
 When cutting it chipped really easy!
I knew the paint would cover any blemishes I did to the wood.
 Painting it was easy.  I used two coats to cover the piano.
I knew using the Jacobean wax from Fiddes and Sons would give it the rich black look I was going for.  I did no want a shiny piano.  It just is not me.  If you want a shiny look, do NOT use chalk paint--it is not Glossy.
 Here it is painted and buffed.  You can see that it is not quite that glossy, shiny finish, but the buffing does shine it up some.  I love the new jewelry (knobs) I bought at a local prim gift shop.
I am enjoying the new look!
Now to find a real piano bench.