"EXCEPT THE LORD BUILD THE HOUSE, THEY LABOR IN VAIN THAT BUILD IT"......Ps.127:1a
Showing posts with label craftsale. Show all posts

Wednesday, December 3, 2014

Craft Sale Open House 2014

I just wanted to thank all who came out and supported my friends and I at my annual Open House!
Here are some pics from this year's sale.


Now time to decorate my home for Christmas.
I can't believe it is December!
Really?

Friday, December 13, 2013

Bits ~n~ Bobs

I am so far behind on Christmas.
I haven't even written out my cards yet.  You would think I'd have some Christmas posts going on here, but alas I have been working on some regular projects.  I guess my Christmas posts will come in January, yes, I can be that kind of person.  Christmas can last all year with me :)

I just had to share with you this project, because a customer realized, I guess, that I can maybe turn this outdated planter on the left into something useful and updated on the right.  They didn't want this back, so it was mine to do with what I wanted.  I decided to get rid of the heart.  Hubby cut along the line I had drawn.  He is so much better with a saw than I am :)  
 I used Annie Sloan's Old White (Love Chalk Paint).  Next I printed off the saying "Bits n Bobs", because I thought it could be a catch all container. I layered it with burlap and Mod-Podged away.  I added a handle I had collected from somewhere along my junking journey.  Finally a little clear and dark wax and VIOLA!
I love the barrel look it has.
It sold the first day of my craft sale!  
Now back to the signs I need to get finished.

Saturday, November 23, 2013

Ornaments Using Webbing Scraps

Blogging has been at a complete halt as I am frantically trying to prepare for my craft sale, keep up with school and everyday life.  My house looks like a tornado came through, but I know I will be ready to welcome customers this Wednesday.
I thought I'd share with you a cute and easy ornament idea.
I started with webbing, greens, tags, candy canes made from pipe cleaners, and a paper tag I cut myself out of card stock.  I did pre-stain my metal tags so that I would just be ready to use them whenever.  You don't have to stain them.
 Next I printed some sayings off of the computer and tea-dyed them.  When they were dried I Mod-Podged them onto the tags.
 Here are the ornaments all assembled together with some twine.
Okay, so maybe it is not the fastest ornament to do, but it is a great way to use some webbing scraps.  I also realized I got rid of the paper tag and just used the webbing for a background.  I will share with you some tags I made from the card stock soon :)

Monday, September 10, 2012

I Made a Rustic Table

We have been enjoying a 9/11 conference at our church called Awake America.
Tomorrow night is the last night, and I just hate to see it end.  I have been so educated these past two days about our Founding Fathers and the Constitution.  It is been one amazing history/Bible lesson.   The kids have loved it too.  I can't believe how much public school didn't teach me.  Now I know it is because they were pushing their own philosophy on the children.  Can you say G-U-L-I-B-L-E?  That is what I was!
If you are in the Hunt Valley, MD area, I urge you to come out and listen to Dr. Chuck Harding.
Here is the church's Website Hunt Valley Baptist Church where you can find the address and time of the service--which is 7pm.
I hope you'll come!

Okay, Now for a little project that I was determined to build.
About two years ago we gutted our attic.  There was a small rustic door that was there to block the crawl space on the other side of the wall.  I knew I wanted to make a table with the boards.
I used pallet wood to build a frame.
Unfortunately hubby doesn't tear things apart nice and neat, and I could only salvage three boards from the little door.  The one side of the door was painted purple.  I chose NOT to display that side.
I nailed the door pieces to the frame.
I then flipped it over attached some 1x2's for legs.
I used part of our balcony that is falling a part for braces on the table legs.
Don't ask me what is bracing our banister on the deck--DANGER!
Here it is before I painted the legs.
I painted the legs in a sandstone color and stained them with Dark Walnut Stain.
You can hardly tell from the pic that I even painted the legs.  They blend in with the pallets that I used for the frame.  My purpose for this rustic little table is to use it to display some crafts at my sale in November.
It reminds me of a table that you would find in a primitive kitchen circa 1800's.
So what do you think of my rustic ole table?
For now, it will hold my plants in the house.
I just want to enjoy it for a bit :)

Linking Up With:
Furniture Feature FridaysFunky Junk's Sat Nite Special

Saturday, September 1, 2012

Rustic Pallet Tray/Box

Every November for the past 9 years I have held a craft sale in my home.  I am always trying to figure out how I can make it look better every year.  I actually try to make my home look like a store. Many times people thought it was a store and came back a week later only to find that all of my furniture and home decor had taken the place of all the crafts.
For this year's sale, I want to make some shelving and boxes out of the pallets I have collected.  I love using crates and wood boxes as back drops to the crafts.  Here is one little idea I came up with.

This wording was on the side of one of the pallets.  I knew I wanted to use it in a project.
I cut the boards to the right size and added two wider pallet boards for the bottom.
For the sides I added two medium size pallet boards.
I really wanted it to have handles.
 So....
in my stash of wood I found my last piece of wood lathe.
Hubby threw away all the lathe from our attic demo.  I am so sad about that. The wood lathe really adds to the pallet wood for finishing touches.  So now I am on the hunt for some wood lathe :)
Okay, back to my little project.
I cut the lathe so that it fit across the wood box like a handle.  I must tell you that this was my sons idea first.
Brilliant!
So now I have another neat wood box to use as a back drop to my crafts.
I did take some of Minwax's dark walnut stain and brushed it over the fresh cut wood to antique it.
So.....
does anybody have some wood lathe they don't want?:)

Linking Up With:
Photobucket

Monday, March 28, 2011

Twiggy Wreath Tutorial

Twiggy Wreath Tutorial

Last year we put new windows in our attic.
Our home was built in 1950, and the old windows were original.
To others they would probably be in the trash.
Not me.  I saw some potential.


My Window was too bare.  I wanted to buy a twiggy wreath to put on it.  They are expensive!  Well for twigs anyway.  I have made grapevine wreaths, so I thought I would try my hand at the twiggy spray wreath.

What you need:

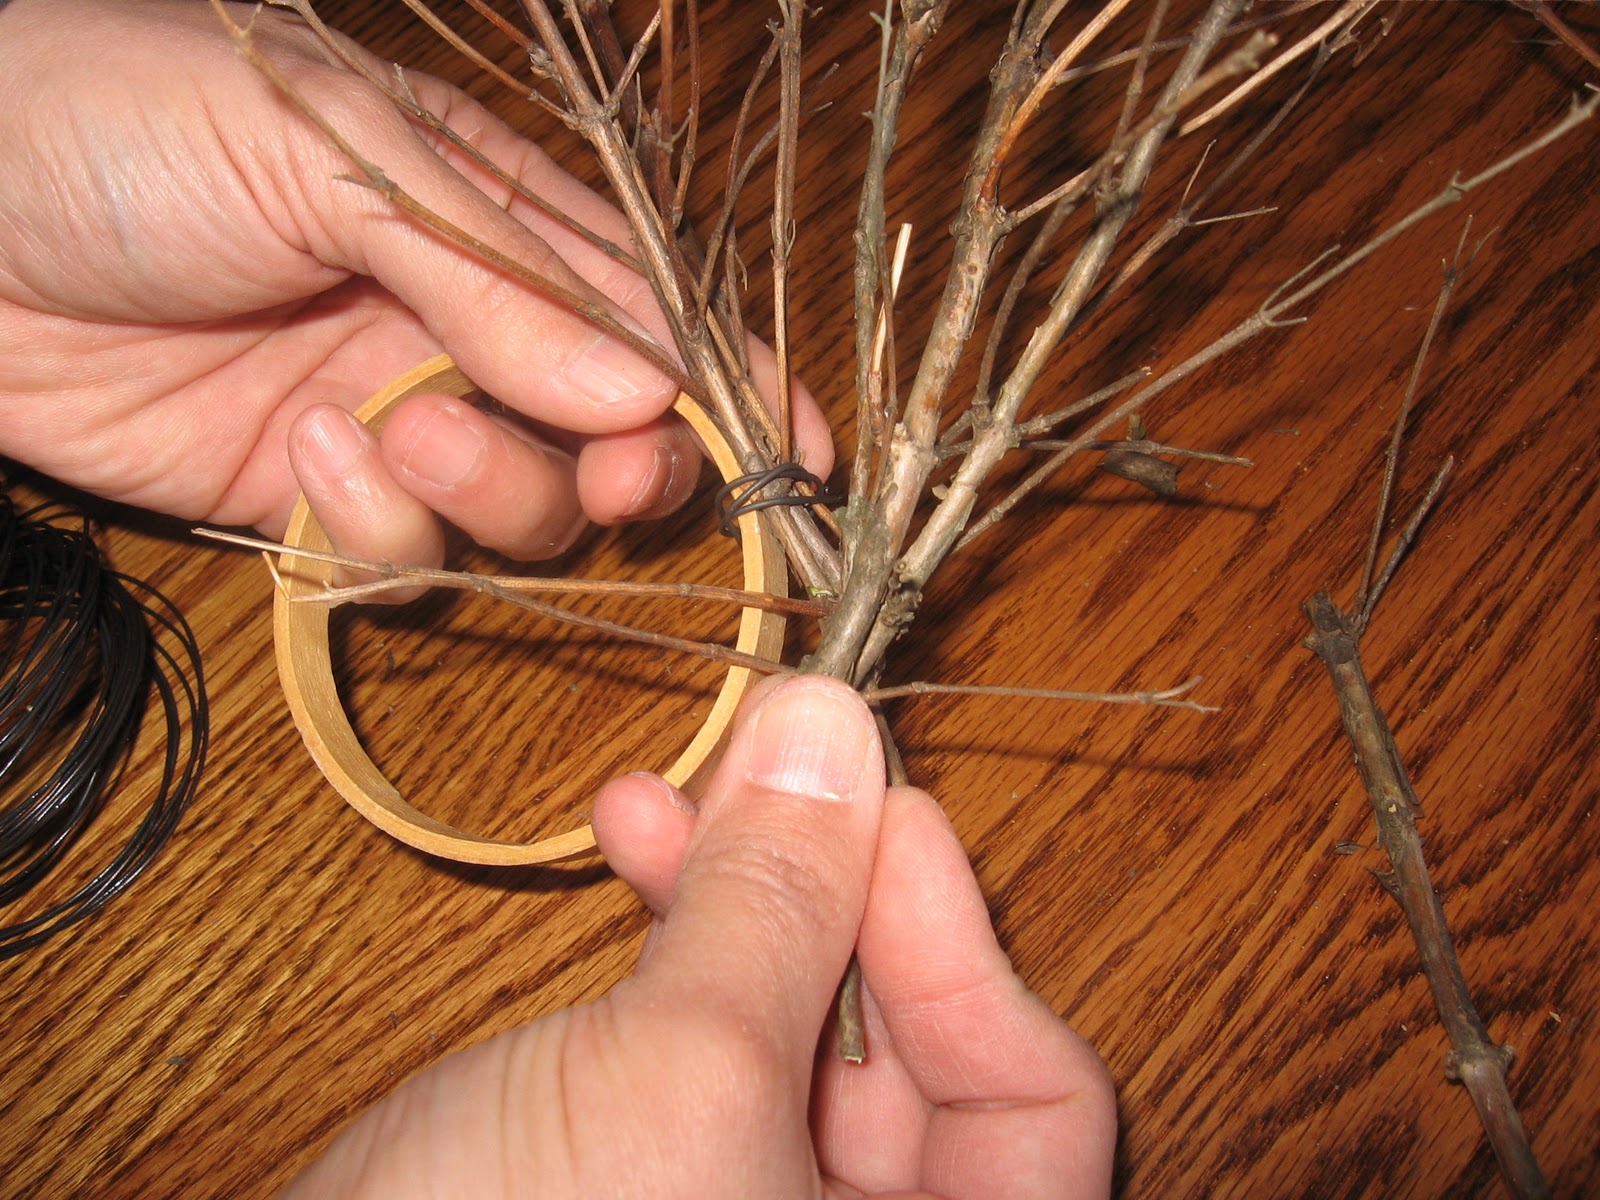
Something for your circle base.  You could use a little sampler hoop like this one.


Using the inside of the hoop only.


You will also need crafting wire, pliers and freshly cut twigs.  I got my branches off of a Snowball bush that needed trimmed.


Next, trim the desired twigs off of your branch, and connect the twigs to the circle base using your crafting wire.


*Try to cover the front of your base with the twigs.  I was re staging what I did back in the Fall and I wasn't careful enough to cover this base...sorry.*

Repeat this step and keep overlapping the twigs securing them each time.


The end result:


Go save yourself some money! 

For the Window:

~I had to remove the glass from the window carefully.

~Next, I sanded the old paint, being careful because of the lead paint that was most likely on the window.

~After sanding the window, I painted it with acrylic paint using a brush.
Pecan is the color I used.

~I let the paint dry completely before staining.   
I used Min-wax walnut color stain.
Wearing rubber gloves and being in a well ventilated area, I applied the stain with a brush and let the stain soak in for a good 2 min before wiping the stain off with a dry rag.  I like the primitive look, so I don't like to wipe off too much of the stain....esp. around the crevices.  It gives it that old look with the dark stain in them.
The more dings, the more character the stain brings out.

Thanks for visiting!  I hope you enjoyed it!

Tuesday, November 23, 2010

Craft Sale

It's here!  
We are starting our craft sale tomorrow morning at 9am! 


My friend made these awesome cookies this year.  She is so creative!


 I am looking forward to celebrating our Thanksgiving  the Monahan way.

Have a Happy Thanksgiving everyone!

Thursday, November 18, 2010

Scraps n Such


My craft sale is right around the corner.  I am getting excited and anxious because I still have tons of ideas in my head and time is running out.  One idea came last week.
Last week my father in law built new steps and did the trim work up in our attic.  He asked my younger two children to help carry out trash.  My ears perked up and right away I was searching the left over pieces that they were carrying out to the trash.  I said, "WAIT!  Don't throw that away.  That is great wood scraps!"  "Take a detour to the basement, now!"  My father in law laughed at me.  He knows I have a hard time throwing things away.  
After they left, I went right to work.  Creating something new from these scraps of trash. This is what I came up with.


I can't believe I built it.  I was so brave to use Dan's saw and nail gun.  It kind of made me feel tough.  I made some other little primitive boxes too.